Key takeaways
- When the air inlet is opened, the gas mixes with oxygen: the flame turns blue and can reach around 1,500 °C in its hottest zone.
- The famous “aseptic dome” does not come from the flame sterilizing everything around it. It is mainly based on hot-air movement created by convection… at least in theory!
- For a loop or straight wire, it is different: the metal is heated directly until it glows red, then it must cool down before touching the culture.
We have been using it in microbiology for so long that we hardly question it anymore.
We turn on the gas, light the flame, adjust the collar to get a nice blue flame… and start working.
But how does a Bunsen burner actually work?
Why does the flame turn blue? How is it supposed to create the famous “aseptic dome”? Why do we flame the neck of tubes and flasks? And how can a few seconds in the flame sterilize an inoculating loop?
That is what we are going to explain in this article.
Why does a Bunsen burner flame turn blue?
A Bunsen burner works mainly by mixing gas with air before combustion.
Gas enters through the base of the burner and travels up the tube. When the air holes at the bottom are open, air also enters and mixes with the gas. The small collar at the base simply controls how much air is available for combustion.
When the air inlet is almost closed, the flame is usually yellow, very bright, cooler, and may produce soot.
As the air inlet is opened, more oxygen mixes with the gas. Combustion becomes more complete, and the flame becomes blue, more stable, and much hotter.
And it gets really hot. Depending on the gas and burner setting, the hottest zone can reach around 1,500 °C.
However, the whole flame is not at this temperature. The temperature varies a lot from one part of the flame to another. The best area for heating an object is usually just above the tip of the inner blue cone.
How is a Bunsen burner supposed to create an “aseptic dome”?
For a long time, at SuperMicrobiologists, we thought the Bunsen flame was so hot that it “killed” all microorganisms within 5 to 10 cm around it.
But that is not how the theory of the aseptic dome works at all.
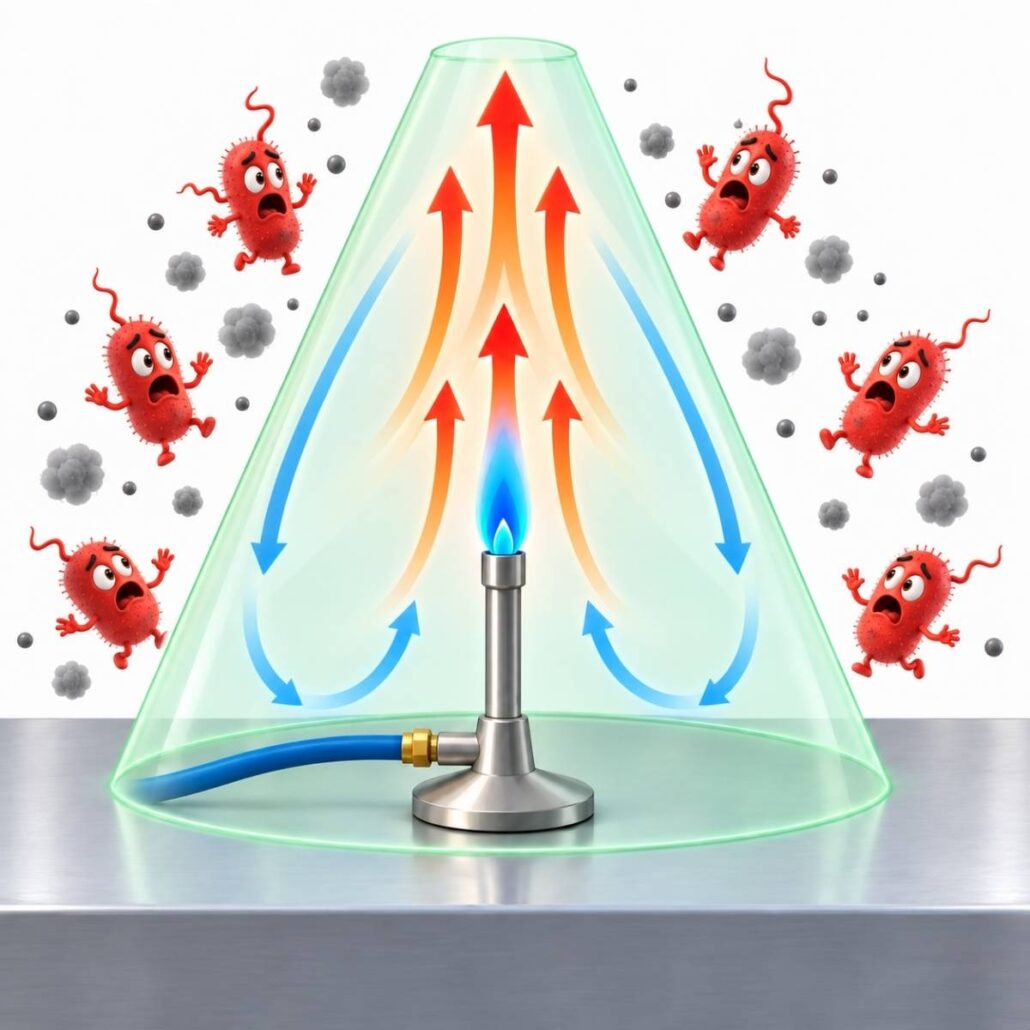
The mechanism is mainly based on air convection. The flame heats the surrounding air. This air becomes less dense and rises, creating an upward airflow above and around the burner.
The idea is that this airflow carries away some of the dust and airborne particles, including particles that may carry microorganisms. They should therefore be less likely to settle close to the working area.
On paper, the idea sounds quite logical.
The problem is that hot air moving upward does not necessarily mean that a truly aseptic zone is created around the burner.
A 2026 study published in Microbiology Spectrum compared microbial deposition near a lit Bunsen burner and an unlit burner. Overall, the researchers did not find fewer microorganisms on the plates placed near the flame.
We also looked at this question in our own collaborative experiment involving 126 laboratories. Once again, the results suggest that we should take a more critical look at this famous “aseptic dome”.
In short: hot air rises, that is certain. But calling the area around the flame a true “sterile dome” is much less obvious.
Why do we flame the neck of tubes and flasks?
This is another habit many of us learned in our very first microbiology practical classes.
We open the tube, quickly pass the neck through the flame, sample or inoculate… then flame it again before closing it.
But does the heat really sterilize the neck of the tube?
There are actually two different effects to consider.
First, the heat can destroy microorganisms that may be present directly on the rim of the tube. ATCC describes passing the opening of the tube through the flame as a way to kill microorganisms that may be present on this area.
But there is also a second mechanism. Heating the neck warms the air around the opening. This air rises and creates a small upward airflow, which is supposed to reduce the chance of airborne microorganisms falling into the tube or flask.
This is the principle described in the Biosafety in Microbiological and Biomedical Laboratories manual from the CDC and NIH.
However, a few seconds of flaming should not be considered a validated sterilization process for the whole neck. The actual temperature reached by the glass and the exposure time are not controlled as they would be in a validated sterilization process.
More importantly, the real effectiveness of this practice in preventing contamination has already been questioned.
In a study published back in 1972 (yes, we know… that was a while ago!), researchers compared microbiological transfers performed with and without flaming the tube neck. They did not observe a significant reduction in contamination from flaming.
Once again, the physical mechanism is real. But its actual impact on contamination risk may be less impressive than we imagine.
How do you sterilize an inoculating loop or straight wire?
Here, the principle is much simpler.
This time, the goal is not to move the air: the metal is heated directly to destroy the microorganisms on it.
The inoculating loop (or öse) and straight wire are introduced gradually into the flame, then placed in its hottest zone, just above the inner blue cone.
After use, it is better to start by heating the wire gently before moving it into the hottest part of the flame. This helps reduce crackling and possible splashes from biological material still present on the loop.
And how long should you heat it?
There is no universal time. A thin loop heats up much faster than a thicker wire, and the heating rate also depends on where it is placed in the flame.
So protocols use a much simpler visual check: heat all the metal that may have been contaminated until it glows red.
This is also the criterion described by ATCC for inoculating loops and wires.
Then comes probably the hardest part of the whole procedure: waiting for the loop to cool down.
Because who has never used a loop that was still just a little too hot?
And let’s be honest: putting a red-hot loop into agar and watching the agar instantly melt around the wire is strangely satisfying… even though we know perfectly well we should not do it!
A loop that is still too hot can obviously kill the microorganisms you are trying to pick up. So it must be allowed to cool naturally before touching the colony or culture.
And there is no point blowing on it to save time… that would be a rather creative way to recontaminate the instrument you have just sterilized.